โมดูลการซ่อมแซม (Advance Repair module)
โมดูลการซ่อมแซมสำหรับร้านรับซ่อม
โมดูลการซ่อมแซมสำหรับ POS Pro Cafe ช่วยในการจัดการบริการซ่อมแซมสินค้าอิเล็กทรอนิกส์ เช่น โทรศัพท์มือถือ คอมพิวเตอร์ เดสก์ท็อป แท็บเล็ต โทรทัศน์ นาฬิกา อุปกรณ์ไร้สาย เครื่องพิมพ์ เครื่องมืออิเล็กทรอนิกส์ และอุปกรณ์ที่คล้ายกันอื่นๆ อีกมากมายที่คุณจะจินตนาการได้!
คุณลักษณะในโมดูลการซ่อมแซม:
- ซ่อมแซมใบงานและมอบหมายให้ช่างเทคนิค
- สถานะการซ่อมที่กำหนดค่าได้พร้อมรหัสสีเพื่อให้ระบุได้ง่าย
- จัดการอุปกรณ์ (เช่น มือถือ คอมพิวเตอร์ แท็บเล็ต ฯลฯ)
- จัดการรุ่นอุปกรณ์
- รายการตรวจสอบที่กำหนดค่าได้สำหรับรุ่นอุปกรณ์
– เพิ่มสินค้า (อะไหล่) และบริการตามรุ่นอุปกรณ์
– มอบหมายงานซ่อมให้กับช่าง (พนักงานบริการ)
– จัดการการซ่อมโดยระบุวันครบกำหนด, เสร็จสิ้นบน, สถานะ, ยี่ห้อ, อุปกรณ์, รุ่นอุปกรณ์, หมายเลขซีเรียล, รายการตรวจสอบการซ่อม, ข้อบกพร่อง,
– คุณสมบัติอื่น ๆ อีกมากมายที่ปล่อยออกมา ...
ใบงาน:
เพื่อยอมรับอุปกรณ์สำหรับการซ่อมแซมจากลูกค้า จะมีการสร้างใบงาน เอกสารงานประกอบด้วยข้อมูลทั้งหมดที่เกี่ยวข้องกับงานซ่อมแซมเฉพาะงาน
Job Sheet คือหน้าคำแนะนำเพื่อช่วยช่างในการซ่อมแซม
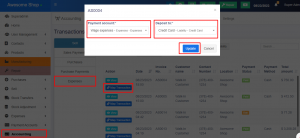
ในการเพิ่มแผ่นงานใหม่:
- เลือกที่ตั้งธุรกิจครับคุณลูกค้า
- ประเภทบริการ: นำเข้า มารับ หรือนอกสถานที่ เมื่อมารับหรือถึงสถานที่ จะต้องกรอกที่อยู่
- เลือกยี่ห้อ อุปกรณ์ รุ่นอุปกรณ์ โดยรายการตรวจสอบก่อนการซ่อมแซมจะปรากฏขึ้นตามนี้
- ป้อนหมายเลขซีเรียลหรือ IMEI, รหัสผ่าน/ล็อครูปแบบการกำหนดค่าผลิตภัณฑ์ ปัญหาที่รายงาน สามารถเลือกสภาพของผลิตภัณฑ์หรือป้อนใหม่ได้ คุ
- สามารถกำหนดบางส่วนไว้ล่วงหน้าสำหรับการเลือกตามที่อธิบายไว้ในส่วนถัดไป
ในทำนองเดียวกัน คุณสามารถเลือกฟิลด์อื่นๆ ได้ - กำหนดผู้ปฏิบัติงาน/ช่างเทคนิค: ผู้ปฏิบัติงานและช่างเทคนิคคือพนักงานบริการ หากต้องการสร้างเจ้
- หน้าที่บริการในบทบาทเพิ่ม/แก้ไข ให้สิทธิ์เจ้าหน้าที่บริการ
รายละเอียดลูกค้าในเอกสารงาน:
หากต้องการแสดงรายละเอียดลูกค้าในแผ่นงาน คุณต้องเปิดใช้งานในแผ่นงาน > การตั้งค่า > แผ่นงาน PDF และป้ายกำกับ
เปิดใช้งานช่องทำเครื่องหมาย 'แสดงข้อมูลลูกค้า' และเพิ่มป้ายกำกับชื่อลูกค้าข้างๆ
เลื่อนลงและเลือกข้อมูลลูกค้าเฉพาะที่จะแสดง เช่น ชื่อลูกค้า ที่อยู่ ฯลฯ
อัปเดตและบันทึกการเปลี่ยนแปลง เมื่อใดก็ตามที่มีการสร้างใบงานใหม่ รายละเอียดลูกค้าจะปรากฏขึ้น

การพิมพ์ฉลากสำหรับใบงาน:
สามารถพิมพ์ฉลากแผ่นงานได้
- ไปที่ รายการแผ่นงาน > ดู > พิมพ์ฉลาก
แจ้งใบงาน:
สำหรับการส่งการแจ้งเตือนสำหรับใบงาน ให้เปิดใช้งานประเภทการแจ้งเตือนที่จำเป็นในขณะที่สร้าง/แก้ไขใบงาน
นอกจากนี้ อย่าลืมเพิ่มเทมเพลตสำหรับการแจ้งเตือนในการตั้งค่าการซ่อมแซม -> สถานะ [หากเทมเพลตว่างเปล่า ระบบจะไม่ส่งการแจ้งเตือน]
การตั้งค่าการซ่อมแซม:
- สถานะแผ่นงานเริ่มต้น: สถานะเริ่มต้นซึ่งจะถูกเลือกไว้ล่วงหน้าในแผ่นงานเพิ่ม
- คำนำหน้าหมายเลขแผ่นงาน: คำนำหน้าสำหรับหมายเลขอ้างอิงแผ่นงานซึ่งจะถูกสร้างขึ้นโดยอัตโนมัติ
- รายการตรวจสอบการซ่อมแซมเริ่มต้น: รายการตรวจสอบเริ่มต้นจะแสดงสำหรับอุปกรณ์และรุ่นอุปกรณ์ทั้งหมดในหน้าจอเพิ่ม/แก้ไขแผ่นงาน
- การกำหนดค่าผลิตภัณฑ์ ปัญหาที่ลูกค้ารายงาน สภาพของผลิตภัณฑ์: รายการการกำหนดค่าผลิตภัณฑ์ที่กำหนดไว้ล่วงหน้าที่จะใช้ในการเพิ่ม/แก้ไขใบงาน
- ข้อกำหนดและเงื่อนไขการซ่อม: ข้อกำหนดและเงื่อนไขที่จะแสดงในส่วนท้ายของใบงาน
การเปลี่ยนป้ายกำกับ:
ป้ายกำกับฟิลด์ที่กำหนดเองของแผ่นงานสามารถเปลี่ยนได้โดยไปที่ ซ่อมแซม > การตั้งค่า > การตั้งค่าการซ่อมแซม > ป้ายกำกับสำหรับฟิลด์ที่กำหนดเองของแผ่นงาน
ใบงานและสถานะการซ่อมแซม:
- สามารถเพิ่ม/แก้ไขสถานะได้จากการซ่อมแซม -> การตั้งค่า -> สถานะ
- ช่องสถานะ:
- ชื่อสถานะ: ชื่อที่แสดงสำหรับสถานะ
- สี: สีเพื่อวัตถุประสงค์ในการระบุตัวตน
- ลำดับการจัดเรียง: ลำดับที่จะแสดงสถานะ
- ทำเครื่องหมายสถานะนี้ว่าเสร็จสมบูรณ์: สถานะใดๆ ที่เลือกไว้จะถือว่าเป็นสถานะที่เสร็จสมบูรณ์
- เอกสารงานหรือการซ่อมแซมที่มีสถานะนี้จะถือว่าเสร็จสมบูรณ์
- เทมเพลต SMS: เทมเพลตสำหรับส่ง SMS พร้อมสถานะเฉพาะนี้
- หัวเรื่องอีเมล, เนื้อความอีเมล: เทมเพลตอีเมลสำหรับส่งสำหรับสถานะเฉพาะนี้
การจัดการอุปกรณ์:
- เพิ่มอุปกรณ์ที่คุณซ่อมพร้อมชื่ออุปกรณ์และคำอธิบาย
รุ่นอุปกรณ์:
- เพิ่มทุกรุ่นสำหรับแต่ละอุปกรณ์ โดยกรอกชื่อรุ่น เลือกยี่ห้อ(อุปกรณ์เสริม) เลือกอุปกรณ์(อุปกรณ์เสริม)
- รายการตรวจสอบการซ่อม: เพิ่มสัญลักษณ์ ( | ) ซึ่งสามารถใช้เพื่อตรวจสอบอย่างรวดเร็วเมื่อยอมรับอุปกรณ์สำหรับการซ่อมแซม
หมายเหตุ: บางครั้งการรักษารุ่นอุปกรณ์อาจเป็นเรื่องยากในกรณีนี้ ให้เพิ่มรุ่นอุปกรณ์ที่เรียกว่า อื่นๆ ซึ่งสามารถเลือกได้ในใบงาน
Advance Repair module
Repair Module for UltimatePOS
Repair module for UltimatePOS helps with complete repair service management of electronic goods like Cellphones, Computers, Desktops, Tablets, Television, Watch, Wireless devices, Printers, Electronic instruments, and many more similar devices which you can imagine!
Feature in Repair Module:
- Repair job sheet and assign it to the technician.
- Configurable repair status with color code for easy identification
- Manage Devices (like Mobile, Computer, Tablets, etc)
- Manage Device models
- Configurable checklist for device models
– Add products (spare parts) & services as per device models.
– Assign repair to a technician (service staff)
– Manage repair with a due date, completed on, status, brands, device, device models, serial number, repair checklist, defect,
– Many more feature releasing …
Job Sheet:
To accept the device for repair from a customer, a job sheet is created. A job sheet contains all information related to a particular repair job.
Job Sheet is a page of instruction to help the technician in performing the repair.
To add a new job sheet:
- Select Business Location, customer
- Service type: carry-in, pickup, or on-site. With pickup or onsite, the address has to be entered
- Select Brand, Device, Device Model, based on this a pre-repair checklist will be shown.
- Enter the serial number or IMEI, Password/Pattern Lock
- Product Configuration, Reported problem, condition of the product can be selected or new can be entered. You can pre-define some of this for selection as described in the next section.
- Similarly, you can select other fields.
- Assign Operator/Technician: Operator & Technician are service staff. To Create service staff in add/edit role give the Service staff permission.
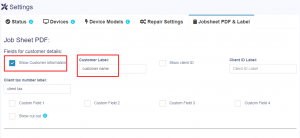
Customer Details in Job Sheet:
To display customer details in the job sheet, you need to enable it in Job Sheet > Settings > Jobsheet PDF & Label.
Enable the ‘Show Customer information‘ check box and add the customer name label next to it.
Scroll down and select the particular customer information to be displayed, like customer name, address etc.
Update and save the changes. Whenever a new job sheet is created the customer details will be displayed.
Printing Labels for Job Sheet:
Job sheet labels can be printed.
- Go to List Job Sheets > View > Print Label
Job Sheet Notification:
For sending notifications for job sheets, enable the required notification type while creating/editing a job sheet.
Also, make sure to add the template for notification in the repair settings -> Status. [if the template is blank, notification is not sent]
Repair Settings:
- Default Job Sheet Status: Default status which will be pre-selected in add job sheet.
- Job sheet number prefix: Prefix for Job sheet reference number which will be auto-generated.
- Default repair checklist: The Default checklist will be displayed for all devices & device models in add/edit job sheet screen.
- Product Configuration, Problem Reported By The Customer, Condition Of The Product: Pre-defined list of product configuration to be used in the add/edit of the job sheet.
- Repair terms & conditions: Terms and conditions to be displayed in the job sheet end.
Changing Label:
Job Sheet custom fields labels can be changed by going to Repair > Settings > Repair Settings > Label for job sheet custom field
Job sheet & Repair Status:
- Status can be added/edited from Repair -> Settings -> Status
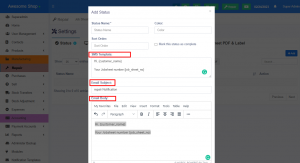
- Status fields:
- Status Name: display name for status
- Color: Color for identification purposes.
- Sort Order: The order in which the status will be displayed.
- Mark this status as complete: Any status having this checked will be assumed as completed status. Job sheet or Repair having this status will be assumed as completed.
- SMS Template: Template for sending SMS with this particular status
- Email Subject, Email Body: Email template for sending for this particular status
Device Management:
- Add the devices you repair with the device name and description.
Device Model:
- Add all models for each device. By enter model name, selecting brand(optional), selecting device(optional)
- Repair Checklist: Add Pipe ( | ) separated checklist which can be used for quickly checking when accepting the device for repair.
NOTE: Sometimes maintaining a model can be difficult in that case add a model called Others which can be selected in the job sheet.