เค้าโครงใบแจ้งหนี้ (Invoice Layout)
เค้าโครงใบแจ้งหนี้
เค้าโครงใบแจ้งหนี้ช่วยให้คุณสร้างรูปแบบใบแจ้งหนี้ต่างๆ
หากต้องการเพิ่มโครงร่างใบแจ้งหนี้ใหม่:
- ไปที่ การตั้งค่า->การตั้งค่าใบแจ้งหนี้->เค้าโครงใบแจ้งหนี้->เพิ่ม
- ตั้งชื่อเค้าโครงที่แตกต่างไม่ซ้ำใคร
- เพิ่มข้อความที่จะแสดงด้านบน/ส่วนหัวของใบแจ้งหนี้ โดยทั่วไปอาจเป็นชื่อร้านค้าของคุณ โดยจัดกึ่งกลางด้วยรูปแบบ Heading 1
- เพิ่มรายละเอียดอื่นๆ ที่เกี่ยวข้อง
- คุณสามารถแสดง/ซ่อนช่องที่อยู่ได้
- คุณสามารถทำเครื่องหมายเค้าโครงเป็นค่าเริ่มต้นได้ เค้าโครงเริ่มต้นจะใช้เมื่อไม่พบเค้าโครงสำหรับสถานที่
- คลิกที่บันทึก
หากต้องการใช้เค้าโครงใบแจ้งหนี้ในสถานที่หนึ่ง ให้ไปที่ "ที่ตั้งธุรกิจ -> แก้ไข" และกำหนดเค้าโครงใบแจ้งหนี้
การออกแบบใบแจ้งหนี้:
- ในโครงร่างใบแจ้งหนี้ คุณจะพบตัวเลือกสำหรับการออกแบบใบแจ้งหนี้
- ใช้สำหรับการพิมพ์บนเบราว์เซอร์เท่านั้น และไม่ใช่การพิมพ์บนเซิร์ฟเวอร์การพิมพ์
- การออกแบบที่บางเฉียบใช้สำหรับเครื่องพิมพ์ที่ใช้เครื่องพิมพ์แบบใช้ความร้อน
การแก้ไขเค้าโครงใบแจ้งหนี้ HTML/CSS/Javascript
หากต้องการเปลี่ยนรหัสสำหรับเค้าโครงใบแจ้งหนี้ด้วยตนเอง เส้นทางคือ: resources/views/sale_pos/receipts/{design_name}.blade.php
โดยที่ design_name = ชื่อของการออกแบบที่คุณต้องการเปลี่ยน เช่น classic/elegant/detail/slim เป็นต้น
สรุปภาษี:
หากต้องการดูสรุปภาษีในใบแจ้งหนี้ ให้ไปที่เพิ่ม/แก้ไขเค้าโครงใบแจ้งหนี้ และป้อนตัวเลือก “ป้ายกำกับสรุปภาษี” จากนั้นระบบจะแสดงสรุปภาษีในใบแจ้งหนี้
รวมเป็นคำพูด:
หากต้องการแสดงผลรวมเป็นคำในใบแจ้งหนี้ เปิดใช้งาน:
- แสดงผลรวมเป็นคำพูด
- เลือก "รูปแบบคำ"
ลดราคา:
เมื่อต้องการแสดงราคาต่อหน่วยที่ลดราคาและจำนวนส่วนลดในใบแจ้งหนี้ ให้เปิดใช้งานไฟล์ต่อไปนี้ในโครงร่างใบแจ้งหนี้
- ป้ายราคาต่อหน่วยลดราคา
- ป้ายส่วนลด
รายละเอียดหน่วยแสดงผล:
หากต้องการแสดงสรุปการลดปริมาณจากหลายหน่วย ให้เปิดใช้งานช่องทำเครื่องหมาย 'แสดงรายละเอียดหน่วยฐาน (ถ้ามี)'
การเพิ่มฟิลด์การขายที่กำหนดเองในใบแจ้งหนี้:
คุณสามารถเพิ่มฟิลด์แบบกำหนดเองการขายลงในใบแจ้งหนี้ที่พิมพ์ได้
ขั้นตอนที่ 1: เพื่อให้บรรลุเป้าหมาย ไปที่ การตั้งค่า > การตั้งค่าใบแจ้งหนี้ > เค้าโครงใบแจ้งหนี้
ขั้นตอนที่ 2: เลือกเค้าโครงใบแจ้งหนี้ที่คุณต้องการพิมพ์ฟิลด์ที่กำหนดเองสำหรับการขาย
ขั้นตอนที่ 3: เปิดใช้ช่องทำเครื่องหมายสำหรับช่องขายที่กำหนดเอง เช่น "ขาย 1" "ขาย 2" ฯลฯ แล้วบันทึก
ตอนนี้ เมื่อคุณใช้เค้าโครงใบแจ้งหนี้ที่เลือกนี้ ฟิลด์แบบกำหนดเองที่คุณตั้งค่าสำหรับการขายจะปรากฏบนใบแจ้งหนี้ที่พิมพ์ออกมาโดยอัตโนมัติ
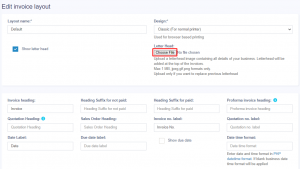
หัวจดหมาย:
คุณสามารถเพิ่มรูปภาพหัวจดหมายที่มีรายละเอียดทั้งหมดเกี่ยวกับธุรกิจของคุณ (ชื่อองค์กร ที่อยู่ ทะเบียนธุรกิจ และรายละเอียดอื่นๆ) ลงในใบแจ้งหนี้ได้
หัวจดหมายจะแสดงที่ส่วนบนของใบแจ้งหนี้
- ไปที่ การตั้งค่า > การตั้งค่าใบแจ้งหนี้ > เค้าโครงใบแจ้งหนี้
- เปิดใช้งานช่องทำเครื่องหมาย "แสดงหัวจดหมาย"
- อัปโหลดไฟล์หัวจดหมาย (สูงสุด 1 MB)
Invoice Layout
Invoice Layout helps you to create different invoice formats.
To add a new invoice layout:
- Go to Settings->Invoice Settings->Invoice Layout->Add
- Give a unique distinguishable Layout name
- Add the text to be shown in the top/header of invoice. Generally, it can be your shop name, aligned center with Heading 1 format.
- Add other relevant details.
- You can show/hide address fields.
- You can mark a layout as default. The default layout is used when no layout is found for a location.
- Click on Save.
To use an invoice layout in a location go to” Business Locations -> Edit” and assign the invoice layout.
Invoice Design:
- In invoice layout, you will find options for invoice designs.
- Used for browser-based printing only & NOT print server-based printing.
- Slim design is used for thermal line printer-based printer.
Editing invoice layout HTML/CSS/Javascript
To manually change the code for invoice layout the path is: resources/views/sale_pos/receipts/{design_name}.blade.php
Where design_name = name of the design you want to change like classic/elegant/detailed/slim etc.
Tax Summary:
To see the tax summary in invoice, go to add/edit invoice layout, and enter the “Tax Summary Label” option and it will show the tax summary in invoice.
Total in words:
To display total in words in the invoice Enable:
- Show total in words
- Choose “Word Format”
Discounted Price:
To display the discounted unit price and discount amount in the invoice, enable the following filed in invoice layout
- Discounted unit price label
- Discount label
Display unit breakdown:
To display the reduction summary of quantity from multiple units, enable the check box ‘show base unit details (If applicable)’.
Adding sale custom fields in the invoice:
The sale custom fields can be added to the printed invoice.
Step 1: To achieve it, Go to Settings > Invoice Settings > Invoice Layout.
Step 2: Select the invoice layout in which you need the sale custom fields to be printed.
Step 3: Enable the checkboxes for the sell custom fields, “sell 1”, “sell2” etc, and save it.
Now, when you use this chosen invoice layout, the custom fields you set up for sales will automatically appear on the printed invoice.
Letterhead:
A letterhead image containing all details of your business(organization name, address, business registration & other details) can be added to invoices.
Letterhead will be displayed at the top portion of the invoices.
- Go to Settings > Invoice Settings > Invoice Layout.
- Enable the “show letterhead” checkbox.
- Upload the letterhead file (Max 1 MB)