สินค้า (Products)
พิ่มสินค้า- ไปที่ – สินค้า > เพิ่มสินค้า
- ระบุชื่อสินค้า
ยี่ห้อ,
หน่วย
หมวดหมู่
หมวดหมู่ย่อย
SKU: เพิ่ม SKU ที่ไม่ซ้ำกันซึ่งจะใช้ในการระบุสินค้าและพิมพ์บาร์โค้ดในฉลาก ปล่อยว่างไว้เพื่อสร้างอัตโนมัติ คุณยังเพิ่มคำนำหน้าสำหรับ SKU ที่สร้างขึ้นอัตโนมัติได้อีกด้วย ขั้นตอนในการเปลี่ยนความยาว SKU เริ่มต้น:
ในการเปลี่ยนความยาว SKU เริ่มต้น ให้ทำการเปลี่ยนแปลงโค้ดง่ายๆ ต่อไปนี้ 1. เปิดไฟล์ pos\app\Utils\ProductUtil.php 2. ค้นหาฟังก์ชัน 'generateProductSku' 3. เปลี่ยนค่าเริ่มต้น 4 เป็นความยาวที่ต้องการ
ประเภทบาร์โค้ด: เลือกประเภทบาร์โค้ด ค่าเริ่มต้น/แนะนำคือตัวเลือก C128 เราขอแนะนำให้เปลี่ยนหากผลิตภัณฑ์ที่เพิ่มมีหมายเลข SKU อยู่แล้วเท่านั้น
ห้ามขาย: หากสินค้าถูกกำหนดให้ไม่ขาย สินค้านั้นจะไม่แสดงใน POS หรือหน้าจอการขาย สิ่งนี้มีประโยชน์เมื่อใช้โมดูลการผลิตเพื่อสร้างส่วนผสมเป็นผลิตภัณฑ์ที่ไม่ขายเช่นกัน หากคุณต้องการปิดใช้งานการขายชั่วคราวสำหรับผลิตภัณฑ์บางอย่าง
ปริมาณการแจ้งเตือน: ปริมาณการแจ้งเตือนใช้เพื่อแจ้งเตือนเมื่อสต็อกคงเหลือถึงระดับนี้หรือต่ำกว่าระดับนั้น
จัดการสต็อก: เปิด/ปิดใช้งานการจัดการสต็อกในระดับผลิตภัณฑ์ ไม่จำเป็นต้องจัดการสต็อกสินค้าสำหรับบริการต่างๆ เช่น การซ่อม การตัดผม การพิมพ์การพัฒนาเว็บไซต์ สำหรับสินค้าที่ไม่ได้เลือกจัดการสต็อก (ปิดใช้งาน) คุณสามารถขายได้ในจำนวนที่ไม่จำกัด การขายบริการโดยใช้ POS
- ที่ตั้งธุรกิจ: เลือกที่ตั้งธุรกิจที่ผลิตภัณฑ์นี้ขายหรือซื้อได้
- เลือกภาษีที่เกี่ยวข้องสำหรับสินค้านั้น การบวกภาษี
- ประเภทสินค้า:
สินค้าเดี่ยว:
- ใช้ได้กับผลิตภัณฑ์ที่ไม่มีการเปลี่ยนแปลงใดๆ จากนั้นเลือกรายการเดียว
- เมื่อเลือกผลิตภัณฑ์เดี่ยว – คุณจะต้องป้อนราคาสินค้าเริ่มต้นรวม/ไม่รวมภาษี อัตรากำไร % (คุณสามารถตั้งค่าอัตรากำไรเริ่มต้นได้จากการตั้งค่า -> การตั้งค่าธุรกิจ ซึ่งจะช่วยพิมพ์ % ทุกครั้ง) ขึ้นอยู่กับอัตรากำไร มันจะคำนวณราคาขายโดยอัตโนมัติโดยไม่รวมภาษี คุณยังสามารถป้อนราคาขายด้วยตนเองได้ และมันจะปรับอัตรากำไรให้คุณโดยอัตโนมัติ
สินค้าหลายรูปแบบ:
- ระบุชื่อสินค้า
ยี่ห้อ,
หน่วย
หมวดหมู่
หมวดหมู่ย่อย
SKU: เพิ่ม SKU ที่ไม่ซ้ำกันซึ่งจะใช้ในการระบุสินค้าและพิมพ์บาร์โค้ดในฉลาก ปล่อยว่างไว้เพื่อสร้างอัตโนมัติ คุณยังเพิ่มคำนำหน้าสำหรับ SKU ที่สร้างขึ้นอัตโนมัติได้อีกด้วย ขั้นตอนในการเปลี่ยนความยาว SKU เริ่มต้น:
ในการเปลี่ยนความยาว SKU เริ่มต้น ให้ทำการเปลี่ยนแปลงโค้ดง่ายๆ ต่อไปนี้ 1. เปิดไฟล์ pos\app\Utils\ProductUtil.php 2. ค้นหาฟังก์ชัน 'generateProductSku' 3. เปลี่ยนค่าเริ่มต้น 4 เป็นความยาวที่ต้องการ
ประเภทบาร์โค้ด: เลือกประเภทบาร์โค้ด ค่าเริ่มต้น/แนะนำคือตัวเลือก C128 เราขอแนะนำให้เปลี่ยนหากผลิตภัณฑ์ที่เพิ่มมีหมายเลข SKU อยู่แล้วเท่านั้น
ห้ามขาย: หากสินค้าถูกกำหนดให้ไม่ขาย สินค้านั้นจะไม่แสดงใน POS หรือหน้าจอการขาย สิ่งนี้มีประโยชน์เมื่อใช้โมดูลการผลิตเพื่อสร้างส่วนผสมเป็นผลิตภัณฑ์ที่ไม่ขายเช่นกัน หากคุณต้องการปิดใช้งานการขายชั่วคราวสำหรับผลิตภัณฑ์บางอย่าง
ปริมาณการแจ้งเตือน: ปริมาณการแจ้งเตือนใช้เพื่อแจ้งเตือนเมื่อสต็อกคงเหลือถึงระดับนี้หรือต่ำกว่าระดับนั้น
จัดการสต็อก: เปิด/ปิดใช้งานการจัดการสต็อกในระดับผลิตภัณฑ์ ไม่จำเป็นต้องจัดการสต็อกสินค้าสำหรับบริการต่างๆ เช่น การซ่อม การตัดผม การพิมพ์การพัฒนาเว็บไซต์ สำหรับสินค้าที่ไม่ได้เลือกจัดการสต็อก (ปิดใช้งาน) คุณสามารถขายได้ในจำนวนที่ไม่จำกัด การขายบริการโดยใช้ POS
- ใช้ได้กับผลิตภัณฑ์ที่ไม่มีการเปลี่ยนแปลงใดๆ จากนั้นเลือกรายการเดียว
- เมื่อเลือกผลิตภัณฑ์เดี่ยว – คุณจะต้องป้อนราคาสินค้าเริ่มต้นรวม/ไม่รวมภาษี อัตรากำไร % (คุณสามารถตั้งค่าอัตรากำไรเริ่มต้นได้จากการตั้งค่า -> การตั้งค่าธุรกิจ ซึ่งจะช่วยพิมพ์ % ทุกครั้ง) ขึ้นอยู่กับอัตรากำไร มันจะคำนวณราคาขายโดยอัตโนมัติโดยไม่รวมภาษี คุณยังสามารถป้อนราคาขายด้วยตนเองได้ และมันจะปรับอัตรากำไรให้คุณโดยอัตโนมัติ
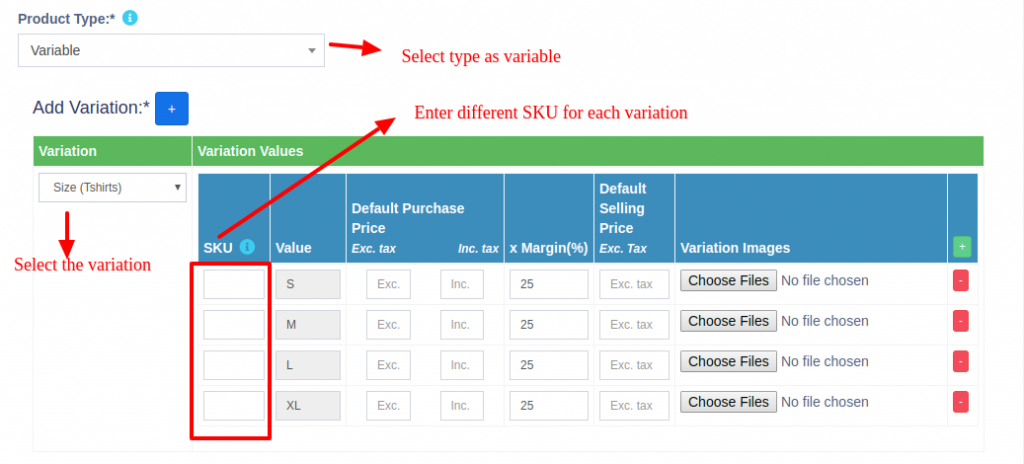
- ใช้ได้กับผลิตภัณฑ์ที่มีรูปแบบต่างๆ (เช่น ขนาดหรือสีหรือการออกแบบหรือรสชาติ ฯลฯ) คุณสามารถกำหนดเทมเพลตรูปแบบต่างๆ ได้จากผลิตภัณฑ์ -> รูปแบบต่างๆ ข้อดีของการสร้างรูปแบบคือช่วยประหยัดเวลาในการเพิ่มรูปแบบเดียวกันหลายครั้ง
- เมื่อเลือกผลิตภัณฑ์แปรผัน – จะแสดงช่องต่างๆ เพื่อเพิ่มรูปแบบทั้งหมดและราคาซื้อ ราคาขายที่เกี่ยวข้อง คุณต้องเลือกรูปแบบจากเมนูแบบเลื่อนลง จากนั้นรูปแบบจะเติมรูปแบบสำหรับเทมเพลตนั้นโดยอัตโนมัติ คุณสามารถเปลี่ยนชื่อตัวแปร ค่ารูปแบบได้
- 🆕 หากต้องการให้ราคาซื้อ ราคาขาย หรือกำไรเท่ากันสำหรับผลิตภัณฑ์ทุกรูปแบบ ให้คลิกที่เครื่องหมายถูกคู่ที่ปรากฏในรูปแบบแรก

- อ่านเพิ่มเติมเกี่ยวกับการเพิ่มรูปแบบ
คอมโบหรือสินค้ามัดรวม

Adding a bundle product
- ผลิตภัณฑ์คอมโบเรียกอีกอย่างว่าผลิตภัณฑ์มัดรวม
- โดยนำเสนอผลิตภัณฑ์หลายรายการเป็นผลิตภัณฑ์เดียว
ตัวอย่างเช่น ผลิตภัณฑ์ “ชุดคอมพิวเตอร์” สามารถมีได้: 1 PC Monitor + 1 PC CPU + 1 PC Keyboard + 1 PC Mouse
ดังนั้นเมื่อมีคนซื้อชุดคอมพิวเตอร์ เธอจะได้สินค้าทั้งหมดไปด้วย - สต็อกของผลิตภัณฑ์ที่รวมกลุ่มจะขึ้นอยู่กับสต็อกของผลิตภัณฑ์แต่ละรายการที่อยู่ในชุดรวมนั้น
ตัวอย่าง: ถ้าคุณมีจอคอมพิวเตอร์ 5 เครื่อง, CPU 4 เครื่อง, คีย์บอร์ด 10 ชิ้น, เมาส์ 50 ชิ้น สต๊อกของชุดคอมพิวเตอร์จะเป็น 4 ชิ้น - เมื่อมีการขายผลิตภัณฑ์แบบมัดรวม สินค้าทั้งหมดที่อยู่ในนั้นจะถูกหักออกโดยอัตโนมัติ
- ผลิตภัณฑ์แต่ละชิ้นที่อยู่ในผลิตภัณฑ์ชุดรวมสามารถจำหน่ายแยกกันได้
- ไม่สามารถซื้อผลิตภัณฑ์แบบรวมกลุ่มได้ แต่จะสามารถซื้อได้เฉพาะผลิตภัณฑ์แต่ละชิ้นที่อยู่ในนั้นเท่านั้นCombo product
คลิกที่บันทึก
คุณสามารถแก้ไขสินค้าได้ คุณยังสามารถคัดลอก / ส่งออกเป็นไฟล์ CSV, PDF หรือ Excel ได้
การเพิ่มผลิตภัณฑ์ที่มีหลายรูปแบบ:
หากคุณมีผลิตภัณฑ์ที่เกี่ยวข้องกับหลายรูปแบบ เช่น เสื้อสามารถมีรูปแบบสีและขนาดได้ เราก็มีหลายวิธีในการทำงาน:
โซลูชันที่ 1 สร้างรูปแบบที่รวมกัน: สามารถใช้รูปแบบที่มีชื่อ "สี-ขนาด" และเพิ่มค่าเช่น สีแดง-เล็ก สีแดง-กลาง สีแดง-ใหญ่ ฯลฯ ซึ่งสามารถนำมาใช้ในขณะที่เพิ่มเสื้อเชิ้ตได้
โซลูชันที่ 2 สร้างผลิตภัณฑ์หลายรายการ: สร้างผลิตภัณฑ์ที่แตกต่างกันหลายรายการ เช่น เสื้อเชิ้ตสีแดง เสื้อเชิ้ตสีเขียว เสื้อเชิ้ตสีน้ำเงิน โดยมีขนาดเป็นรูปแบบต่างๆ เมื่อคุณสร้างผลิตภัณฑ์หลายรายการ คุณจะไม่ต้องป้อนรายละเอียดเดียวกันหลายครั้ง ขั้นแรกให้เพิ่มเสื้อเชิ้ตสีแดงพร้อมรูปแบบขนาดต่างๆ ทั้งหมด จากนั้นใช้การดำเนินการ "สินค้าซ้ำ" เพื่อคัดลอกข้อมูล
เลือกรูปแบบที่ต้องการ:
ขณะเพิ่มผลิตภัณฑ์แปรผัน คุณสามารถเลือกได้เฉพาะค่ารูปแบบที่ต้องการเท่านั้น
ในหน้าจอเพิ่ม/แก้ไขผลิตภัณฑ์ ให้เลือกประเภทผลิตภัณฑ์เป็น "รูปแบบ" และเลือกชื่อรูปแบบ (เช่น สี)
เมนูแบบเลื่อนลงจะปรากฏขึ้น ซึ่งคุณสามารถเลือกค่ารูปแบบที่ต้องการได้

หมายเหตุ: ตัวเลือกนี้ใช้ได้เฉพาะใน POS เวอร์ชัน 5 ขึ้นไปเท่านั้น
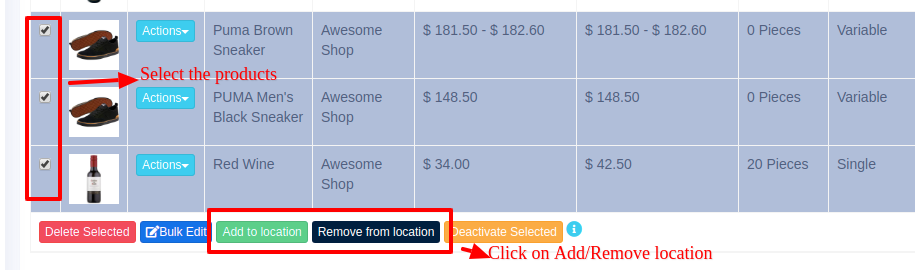
การกำหนด/ลบสถานที่ตั้งของผลิตภัณฑ์หลายรายการพร้อมกัน:
ไปที่รายการผลิตภัณฑ์และอ้างอิงภาพหน้าจอนี้
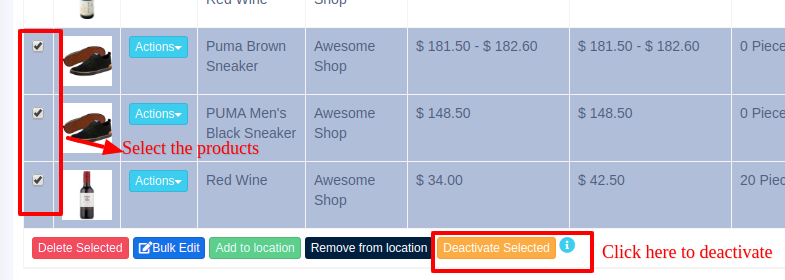
การปิดใช้งานและเปิดใช้งานผลิตภัณฑ์:
อ้างอิงถึงภาพหน้าจอ
การใช้บาร์โค้ดสินค้า:
คำถาม:
เราจะใช้บาร์โค้ดของผลิตภัณฑ์แทนการสร้างและพิมพ์ใหม่ให้กับทุกผลิตภัณฑ์ได้อย่างไร
เราจะใช้บาร์โค้ดของแบรนด์สินค้าแทนการสร้างและพิมพ์สินค้าใหม่ในทุกๆ สินค้าได้อย่างไร
คำตอบ:
เมื่อสร้างผลิตภัณฑ์ ในช่อง SKU ให้ป้อนหมายเลขบาร์โค้ดของผลิตภัณฑ์ บาร์โค้ดนี้จะใช้เพื่อระบุผลิตภัณฑ์ในทุกหน้าจอ เช่น POS การขาย การซื้อ รายงาน และอื่นๆ
จะเพิ่มสินค้าที่มีบาร์โค้ดอยู่แล้วได้อย่างไร?
การเพิ่มสินค้าที่มีบาร์โค้ดอยู่แล้ว ให้ทำตามขั้นตอนเดียวกับการเพิ่มสินค้าอื่นๆ
- ไปเพิ่มสินค้า
- กรอกรายละเอียดสินค้าให้ครบถ้วน
- สำคัญ: ในช่อง SKU ให้สแกนหรือป้อนบาร์โค้ดของผลิตภัณฑ์
การเพิ่มปริมาณสินค้าหรือการเพิ่มสต๊อกสินค้า
เพื่อการจัดการธุรกิจของคุณอย่างเป็นระบบ คุณสามารถเพิ่มปริมาณผลิตภัณฑ์ได้ 3 วิธี:
- การเพิ่มสต็อกเปิด
- การเพิ่มการซื้อ
- ผลิตภัณฑ์การผลิต: มีประโยชน์สำหรับผู้ผลิต โมดูลการผลิตที่จำเป็น
Adding Products
- Go to – Products > Add Products.
- Provide a Product Name,
Brand,
Units,
Category
Sub-category
SKU: Add a unique SKU which will be used to identify the product & Print barcode in labels. Leave it empty to auto-generate it. You can also add a Prefix for auto-generated SKU. Steps to change the default SKU length:
In order to change the default SKU length, make the following simple change in the code. 1. Open the file pos\app\Utils\ProductUtil.php. 2. Search for the function ‘generateProductSku’. 3. Change the default value 4 to any required length.
Barcode Type: Select a barcode type, default/recommended is C128 option. We recommend changing if only if the product added already have an SKU number for it.
Not For Selling: If a product is maked not-for-selling then it will not be displayed in POS or sales screen. This can be useful when using manufacturing module to make the ingredients as product not-for-selling also if you want to temporary disable selling for some products.
Alert Quantity: Alert quantity is used to alert when remaining stocks reaches to this level or below it.
Manage stock: Enable/Disable stock management at a product level. Product stock management is not required for services like Repairing, Hair Cutting, Web Development Printing. For items with Manage Stock Unchecked (disabled), you can sell them in unlimited quantities. Selling of service using POS Procafe
- Provide a Product Name,
- Business Location: Select the business location(s) where this product can sold or purchased.
- Select Applicable tax for that product. Adding Tax
- Product Type:
Single Product:
- Applicable for products with no variation with them then select single
- When selecting Single product – You will need to enter the Default product price including/excluding tax, Profit Margin % (you can set default profit margin from settings -> Business Settings; this will help to type % every time). Based on the profit margin it will auto calculate selling price excluding of Tax. You can also enter the selling price manually and it will auto adjust the profit margin for you.
Variable Product:
- Applicable to a product having variations (like size or color or design or flavors etc) You can define variation templates from Products -> Variations. The advantage of creating variation is that it saves time to add same variations multiple time.
- When selecting Variable product – It will display different fields to add all variations and its related Purchase price, Selling Price. You have to select the variations from the dropdown and it will auto-populate the variations for that template. You can change the variable name, Variation values.
- 🆕 To give same purchase price or selling price or profit for all variations of a product click on the double tick present in the first variation.
- Read more about adding variations
Combo or Bundle Product
Adding a bundle product
- Combo product are also called bundle products.
- It is offering several products as one combined product.
For example a product “Computer Set” can have: 1 PC Monitor + 1 PC CPU + 1 Pc Keyboard + 1 PC mouse
So when someone buys Computer set she gets all the products in it. - Stock of bundled product depends on stock of individual products present in that bundle.
Example: if you have 5 PC Monitor, 4 PC CPU , 10 pc Keyboard, 50 PC mouse, the stock of Computer set will be 4 PC. - When the bundle product is sold, stock of all products inside them is automatically deducted.
- Individual products present in bundle product can also be sold separately.
- Bundle products cannot be purchased, only individual products present in it can be purchased.
Click on Save.
You can edit a product. You can also Copy / Export to CSV, PDF or Excel file.
Adding Products with multiple variations:
If you have products which involve multiple variations like for example a Shirt can have Color & Size variation, then we have multiple ways to work with it:
Solution 1, Create combined variation: Can a variation with a name “Color-Size” and add values like Red-Small, Red-Medium, Red-Large, etc, this can be used for while adding the Shirt.
Solution 2, Create multiple Products: Create multiple different products like Shirt-Red, Shirt-Green, Shirt-Blue with size as variations. When you create multiple products you will NOT have to enter the same details multiple times, first, add the Shirt-Red with all size variations of it and then use the Duplicate Product action to copy the data.
Select Required variations:
While adding variable products, you can select only the required variation values.
In your add/edit product screen, select the product type as ‘variation’ and select the variation name (eg. color).
A dropdown will be displayed, in which you can select the required variation values.
NOTE: This option is available only in POS version 5 and above.