ซัพพลายเออร์และลูกค้า (Supplier & Customers)
สัญญาใดๆ อาจเป็นซัพพลายเออร์ ลูกค้า หรือทั้งสองอย่าง (ซัพพลายเออร์และลูกค้า)
การเพิ่มซัพพลายเออร์และลูกค้า
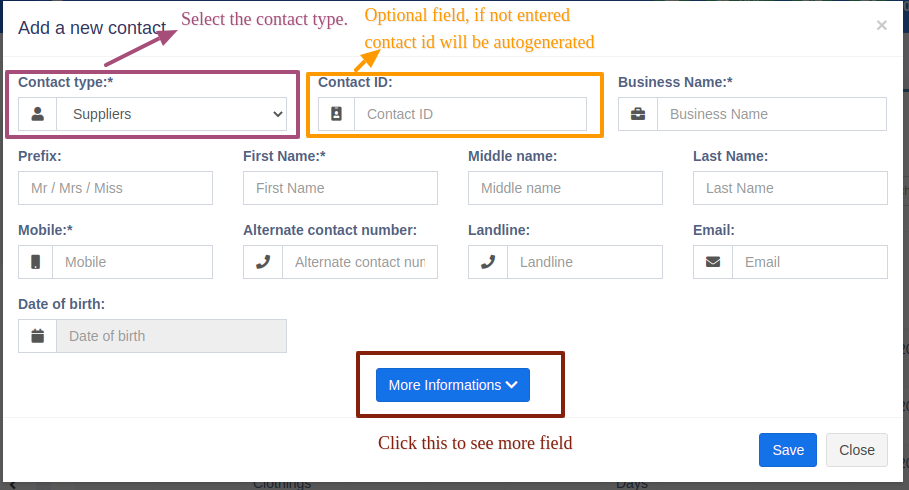
- ไปที่ผู้ติดต่อ -> ซัพพลายเออร์หรือลูกค้า
- คลิกเพิ่มผู้ติดต่อใหม่ เลือกประเภทการติดต่อ – ซัพพลายเออร์/ลูกค้า/ทั้งสองอย่าง
- ขึ้นอยู่กับประเภทผู้ติดต่อที่เลือก – จะแสดงฟิลด์ที่เกี่ยวข้อง กรอกรายละเอียดที่เกี่ยวข้อง
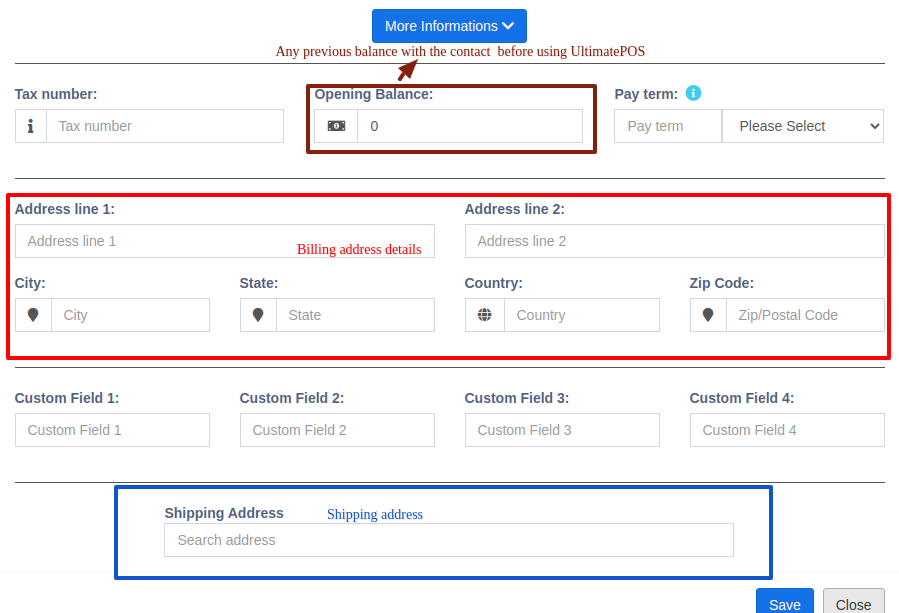
- คลิกที่ปุ่มข้อมูลเพิ่มเติมเพื่อดูข้อมูลเพิ่มเติม เงื่อนไขการชำระเงิน: สิ่งนี้จะช่วยให้ระบบแจ้งให้คุณทราบถึงการชำระเงินที่ค้างอยู่สำหรับซัพพลายเออร์แล
- ลูกค้า คุณสามารถระบุระยะเวลาการจ่ายเงินเป็นวันหรือเดือนก็ได้
- กลุ่มลูกค้า: อ่านรายละเอียดที่นี่
- วงเงินเครดิต: นี่คือจำนวนเครดิตสูงสุดที่สามารถมอบให้กับลูกค้าได้ หากในการขายใดๆ เครดิตเกินจำนวนนี้ จะไม่อนุญาตให้ขายด้วยเครดิต
- ยอดคงเหลือในการเปิด: ยอดคงเหลือเปิดของลูกค้าหรือซัพพลายเออร์ก่อนที่คุณจะเริ่มใช้ UltimatePOS ดังนั้นหากมียอดคงเหลือก่อนหน้านี้ คุณสามารถเพิ่มได้ที่นี่
- ยอดคงเหลือล่วงหน้า: บางครั้งลูกค้า/ซัพพลายเออร์ชำระเงิน/รับเงินล่วงหน้า นี่จะแสดงจำนวนเงินล่วงหน้าที่ลูกค้า/ซัพพลายเออร์ชำระหรือรับตามลำดับ
การดูซัพพลายเออร์และลูกค้า
- หากต้องการดูรายละเอียดเกี่ยวกับซัพพลายเออร์หรือลูกค้าให้คลิกที่ปุ่มดู โดยจะแสดงรายละเอียดทั้งหมดพร้อมกับธุรกรรมที่เกี่ยวข้อง (การซื้อและการขาย) สำหรับผู้ติดต่อนั้น
- จำนวนเงินที่ต้องชำระ: คุณสามารถใช้ปุ่มนี้เพื่อชำระเงินจำนวนที่ครบกำหนดชำระให้กับลูกค้าหรือซัพพลายเออร์ ซึ่งจะชำระยอดที่ต้องชำระโดยรวมสำหรับใบแจ้งหนี้ทั้งหมด
การกำหนดผู้ติดต่อให้กับผู้ใช้
คุณสามารถกำหนดผู้ติดต่อ (ลูกค้าและซัพพลายเออร์) ให้กับการใช้งานเฉพาะได้โดยทำตามขั้นตอนด้านล่าง
- เมื่อเพิ่มผู้ใช้ ให้ตรวจสอบป้ายกำกับ "มอบหมายให้กับผู้ติดต่อเฉพาะ"
- ตอนนี้เมื่อเพิ่มผู้ติดต่อ ให้เลือกผู้ใช้ที่คุณต้องการมอบหมายให้
การเปลี่ยนชื่อลูกค้าเริ่มต้น
การเปลี่ยนชื่อลูกค้าเริ่มต้น
หากคุณต้องการเปลี่ยนชื่อลูกค้าเริ่มต้น “ลูกค้าที่วอล์คอิน” เป็นชื่ออื่น ให้ทำตามขั้นตอนด้านล่าง
- ไปที่ตารางข้อมูลผู้ติดต่อฐานข้อมูล
- เปลี่ยนฟิลด์ชื่อเป็นสิ่งที่จำเป็น
วงเงินสินเชื่อสำหรับลูกค้า
สามารถเพิ่มวงเงินสินเชื่อให้กับลูกค้าได้
เมื่อถึงวงเงินสินเชื่อ จะไม่สามารถขายบางส่วนหรือการขายเครดิตให้กับลูกค้าเหล่านั้นได้
เมื่อต้องการตั้งค่าวงเงินสินเชื่อ ไปที่ ผู้ติดต่อ > ลูกค้า > การดำเนินการ > แก้ไข > ข้อมูลเพิ่มเติม > วงเงินสินเชื่อ
ตั้งค่าฟิลด์นี้ว่างไว้หากไม่มีวงเงินสินเชื่อสำหรับลูกค้า
หมายเหตุ: อย่ากำหนดวงเงินสินเชื่อเป็น 0 เนื่องจากไม่มีวงเงินสินเชื่อ
วงเงินสินเชื่อ = 0 (เครดิตสำหรับลูกค้าคือ 0)
วงเงินสินเชื่อ = ว่างเปล่า (ไม่มีข้อจำกัดสำหรับวงเงินสินเชื่อ(ไม่จำกัด))
Any contact can be supplier, Customer or Both (Supplier & Customers)
Adding Suppliers & Customers
- Goto Contacts -> Suppliers or Customer
- Click on add new contact. Select contact type – Supplier/Customer/Both
- Based on the contact type selected – it will show the relevant fields. Fill the relevant details.
- Click on More More Information button to see more field.
- Pay Terms: This will help the system to notify you of any pending payments for suppliers & customers. You can specify pay term in either days or months.
- Customer Group:
- Credit Limit: This is the maximum amount of credit that can be given to the customer. If in any sales the credit exceeds this amount then it won’t allow selling on credit.
- Opening Balance: Opening balance of a customer or supplier before you start using UltimatePOS. So if there is any previous balance you can add here.
- Advance balance: Sometimes customer/supplier pay/takes money in advance. This wil show the amount of advance balance paid or take by the customer/supplier respectively.
Viewing Suppliers & Customers
- To view details about a Supplier or Customer click on View button. It will show the complete details along with the relevant transactions (Purchases & Sales) for that contact.
- Pay Due amount: You can use this button to pay the due amount for a customer or supplier. This will pay the overall due amount for all invoices.
Assigning Contacts to Users
You can assign contacts(customers & suppliers) to a particular use by following the steps below.
- When adding the user check the label “assign to specific contact”.
- Now when adding contact select the user to whom you want to assign.
Changing default customer name
If you want to change the default customer name “walk-in-customer” to something else follow the steps below.
- Go to the database contacts data table.
- Change the first name field to anything required.
Credit Limit for Customer
Credit limits can be added to customers.
When the credit limit is reached the partial or credit sale can’t be sone for those customers.
To set the credit limit Go to Contacts > Customers > Action > Edit > More Information > Credit Limit.
Set this field blank for not having any credit limit for customers.
NOTE: Do not set the credit limit as 0 for having no credit limit.
Credit Limit = 0 (the credit for the customer is 0)
Credit Limit = blank (no restriction for credit limit(infinite))